Greenhouse farming is prevalent as it can provide crops all over the year if tech is properly utilized. One essential aspect of this farming is insulating. You might think about what the need for insulation is.
Well, greenhouses need to have an optimum temperature, and you should be able to control the temperature. By control, I mean, maintaining the temperature all the time. That way, the plants will have a subtle temperature to survive all year round.
This is the vital reason to know how to insulate a greenhouse. So, following some snappy processes, you can do some high-quality insulating. Let’s dig in to know them.
How to Insulate a Greenhouse – Most Cheap and Cheerful Ways
Well, that was just a quick overview of insulation, but you got to know the in-depth information before stepping into action. Well, let’s get it.
How to insulate a greenhouse with Bubble wrap
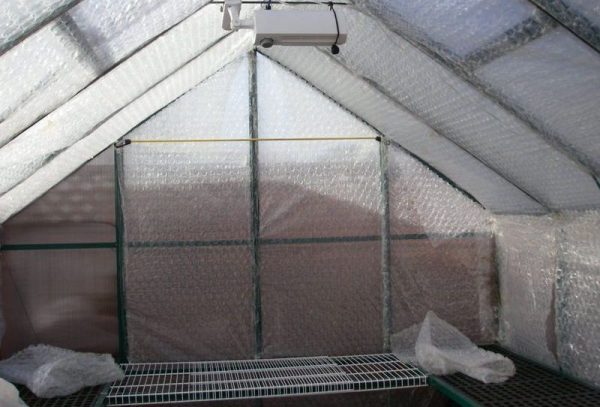
Air provides excellent insulation, and bubble wrap is utterly based on air locked in plastic films. Bubble wrap is mapped out as if it will offer little air pockets that will insulate the greenhouse very easily.
Again these are made of plastic, so they warm up the greenhouse at a gallop. Another thing to mention, the air being an essential operator, disposes to avert temperature shifts.
So, How to use the bubble wrap?
For bubble wrap greenhouse covering, you must have a tape measure, tape, staples or small nails, and of course bubble wrap.
First of all, get your eyes on the plants and see if the plants are receiving any light or not. After that, measure the standing length of the greenhouse with a measuring tape. Once measuring the vertical size is done, move to the bubble wrap measurement. Cut off the extra space of bubble wrap and have an applicable size of it. To make the task handier, spin the bubble wrap in little pieces; as a result, while holding it, you escape losing down.
Coming up next, Put in the bubble wrap over the walls and seal it with tape, staple or nails whatever is handy. Thus keep up this process till each and every area of the greenhouse is clothed.
Now within five minutes, you can insulate the farm with supper feasible bubble wraps. So do hurry up, take bigger bubble wrap or smaller.
Benefits:
- Cost-friendly
- Capable of used again
- Easy to operate
Drawbacks:
- Time-consuming Process
Thermal insulation
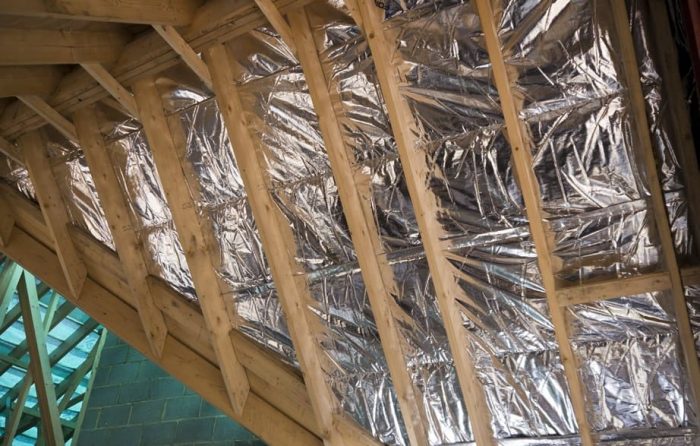
Using thermal insulation to insulate the greenhouse is quite a productive idea for retaining plants heated. This is available at any hardware shop.
The primary element which is used for this insulator is bubble plastic that is put in between two ledges of the thermal. It works for transferring heat between objects of different temperatures. Hence it will show up both heat and light in the house.
Now, How to use thermal insulation?
After dusting the house’s ventilator, join the thermal insulation foil into the north part of the house with a staple or tape. It will be more painless to measure and shorn the thermal paper to the applicable length. Dividing the thermal paper into little pieces and joining them one after another will also give you a smooth solution.
While applying thermal insulation, keep in mind to permanently attach it to the farm’s north side; otherwise, it can prevent some light from reaching the plants.
Benefits:
- Alleviate power cost
- Easy to install
- Ensure security and maintenance of personnel
Drawbacks:
- Restricts sunlight to enter in plants body
Polyethylene Plastic
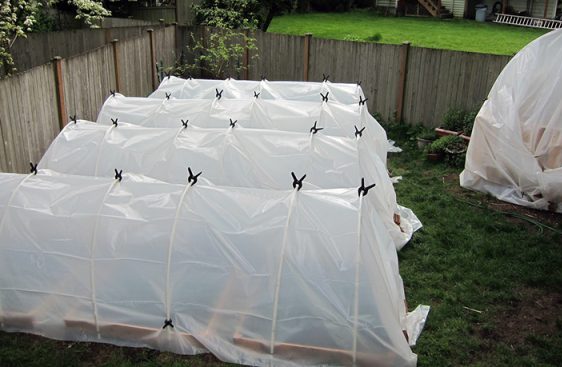
Thinking about how polyethylene plastic can insulate a greenhouse? Well, made of thermoplastic polymer, polyethylene plastic can be extremely effective in insulating the farm during the winter seasons. Even if it’s a long winter, the polyethylene plastic can get it covered. It costs around $20 in hardware stores.
But remember, you’ve to change the plastic every season to insulate plants. This covering won’t protect the plants from another winter season.
So, How to apply polyethylene plastic in a greenhouse?
Before applying it, make sure to wipe the windows. By doing this, you are letting sunlight come into the house directly, which plants really need. But in the winter season, greenhouse seeds won’t receive the actual sunlight; instead, they will get frosted. Regarding that, get the measurement of the greenhouse and cut the polyethylene plastic sheets into appropriate shapes.
Cutting in smaller parts is quite easy and straightforward. You can easily attach them. For linking them, keep the shaped plastics in place, and join them with tape, nail, or staple. Ensure to land the plastic in every corner for proper insulation.
In this soothing installation process, you can protect the farm from the dreadful winter.
Benefits:
- Lightweight build structure
- Durable build quality
- Inexpensive to buy
Drawbacks:
- Low-quality weather resistance
Shade Cloths
If it’s summer that will burn the vegetables, you can count on the shade cloth to insulate the plants. Made of woven polyester or aluminum, the shade cloth can resist most of the burning heat, ranging from 5% to 95%. Plus, it is permeable to water, in case, irrigation systems, sprinklers, and rainwater can move through the cloth and keep the farm hydrated.
Considering the greenhouse, bring a green or black shade cloth because they absorb the most summer heat, including hazardous UV rays as well. The shade cloths work like a greenhouse insulation blanket.
It’s better to choose the green one, rather than the black. Because black can increase the temperature and you can’t watch the farm from outside while the green one allows to see through.
Plus, you would like to combine the shades with ventilations for the herbs to breathe fluently through summer. Regarding, you can opt for automatic windows or regular ventilators.
Benefits:
- Absorbs heat
- Inhales water
- Easy to maintain
Drawbacks:
- Costs a hefty amount of money
Insulation Seals
The warmth of the day can be kept for the night. And that’s what insulation seals do with the help of greenhouse insulation panels; basically, the sealers that prevent heat loss during the night.
Some houses feature silicone sealants or rubber sealers to resist heat loss for the night. For that, some gardeners count on tape to seal holes to prevent heat loss, but this isn’t a lifetime solution.
So, the permanent solution can be the silicone’s insulation seals to cover the corner frames’ cracks. Farms with windows, doors, and vents require glazing strips or rubber seals to close them snugly. But make sure to check the seals always; otherwise, they won’t do any good to the plants.
For instance, you have to maintain the insulation seals while checking if they are insulating the floor as well or not. Repair the holes, gaps, and cracks if you find any on the farm. Ensure the vents and doors are intact and pure so that the garden doesn’t run out of heat at night.
Benefits:
- Easily attachable
- Snugly fits with doors, vents
- Fills the cracks, gaps, and holes
Drawbacks:
- Not waterproof
Conclusion
Coming to an ending, if you want the greenhouse to survive the freezing nights and cold temperatures, then insulate the house, like keeping the plants warm. Now, it’s likely acceptable that you know how to insulate a greenhouse from the processes mentioned above. Select any method to protect the plants from burning summer and freezing winter.
Without proper insulation, the plants will lose their life and never grow. They’ll have to face the harsh face of weather and die eventually. So, I strongly suggest going for an insulation process and saving plants.
Happy farming!