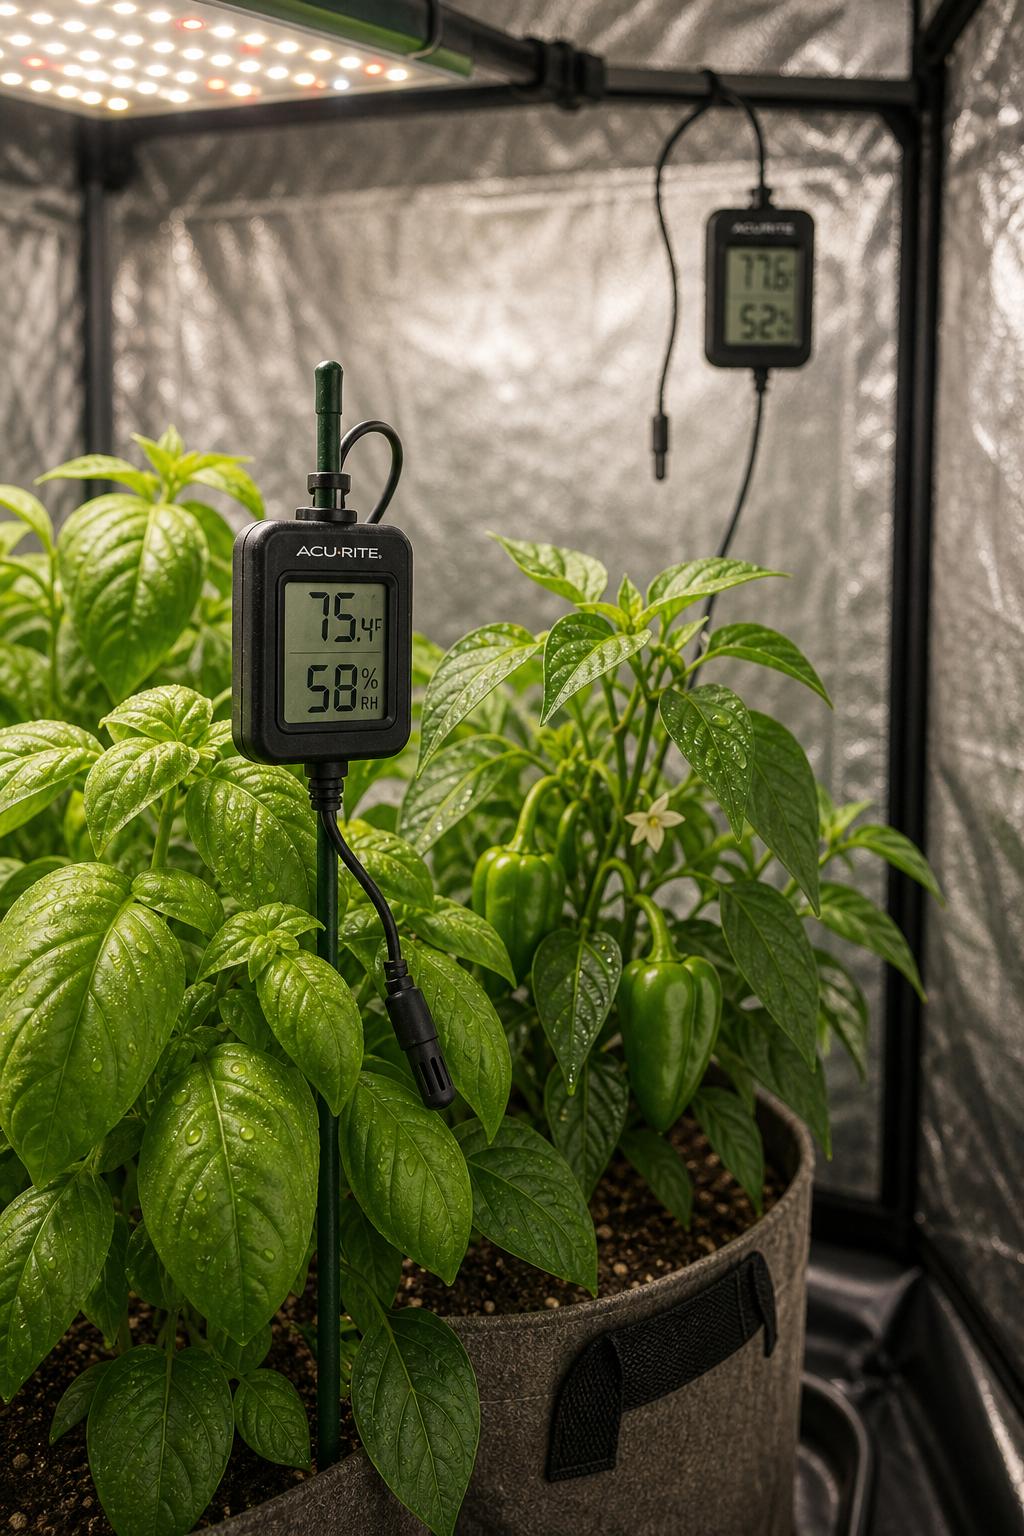
If your grow tent controller says everything is perfect but your plants look stressed, the problem might not be your equipment. It is often sensor placement. I have seen grow tents run with expensive fans, controllers, and humidifiers that still produced unstable conditions simply because the sensor was clipped in the wrong spot.
Inside a grow tent, small positioning mistakes create big swings in readings. Unlike a room, a grow tent is a tight, forced air environment with vertical heat layers and constant air movement. Where you place your sensor determines whether you are measuring real canopy conditions or a misleading pocket of air.
Why Your Grow Tent Numbers Look Stable While Your Plants Disagree
In my experience, most tent growers mount the sensor wherever the cord reaches. Often that means hanging near a pole, sitting on top of the light driver, or dangling near the exhaust path. The controller shows stable numbers, but the leaves tell a different story.
I have noticed three consistent issues inside grow tents:
- Temperature is warmer near the ceiling than at canopy level
- Humidity is lower near strong airflow paths
- Corner air pockets behave differently than the center of the tent
Because grow tents are enclosed and actively ventilated, they develop micro zones. A difference of even a few inches can change the reading by several degrees or several percentage points of relative humidity.
What surprised me most early on was how stable my controller display looked while my canopy temperature was actually three degrees warmer under the lights. My sensor was mounted along the tent pole about eight inches above canopy, right in the path of the oscillating fan. The airflow kept the sensor artificially cool.
The Three Placement Mistakes That Skew Grow Tent Readings
1. Mounting the Sensor Too High in the Grow Tent
Heat rises inside a grow tent. LED drivers, even when efficient, still contribute heat. If your sensor sits near the top cross bars, you are measuring upper chamber air, not canopy air. That often leads growers to reduce light intensity or increase exhaust unnecessarily.
Inside grow tents with strong top mounted exhaust systems, the upper area can also be slightly cooler due to incoming replacement air mixing. Either way, it does not consistently reflect plant level conditions.
2. Placing the Sensor in Direct Airflow
One mistake I see often is growers clipping sensors directly onto an oscillating fan grill or hanging them where air passes continuously. In a grow tent, moving air strips heat and moisture from the sensor probe just like it does from leaves. The reading becomes artificially moderated.
I learned this after chasing humidity problems for weeks. My dehumidifier kept cycling on and off rapidly. The sensor was in front of a fan. Every sweep of the fan arm dropped the humidity reading momentarily, triggering equipment unnecessarily.
A sensor in constant airflow rarely reflects the micro climate inside the canopy.
3. Letting the Sensor Touch Tent Walls or Equipment
Grow tent walls can be cooler or warmer than interior air depending on room temperature. If your probe rests against reflective mylar or a pole, it can conduct temperature from that surface. Similarly, placing a sensor on top of a ballast or LED driver gives you equipment temperature, not air temperature.
Inside grow tents, surfaces change temperature faster than the air mass. Your sensor should measure air only.
Exact Sensor Placement for Temperature and Humidity in a Grow Tent
Here is the placement approach I recommend after years of adjusting grow tent setups.
Step 1 Position at Canopy Height
Your primary temperature and humidity sensor should sit level with the top of your plant canopy. Not above it. Not near the floor. Exactly where your leaves are.
As plants grow, raise the sensor with them. In my grow tents, I reclip the sensor at least once a week during aggressive vegetative growth.
Step 2 Keep It Center Mass
Place the sensor near the center of the grow tent footprint. This usually means a few inches away from the centerline rather than against a wall. Center placement balances airflow influence from intake and exhaust systems.
If you are running multiple oscillating fans, position the sensor between airflow paths instead of directly in one.
Step 3 Suspend It in Open Air
Hang the sensor so it dangles freely, not touching tent poles, walls, or equipment. I prefer using a small clip on string tied to an overhead bar so the sensor sits in open air at canopy height.
This ensures the probe measures true air conditions rather than surface temperatures.
Step 4 Avoid Direct Light Exposure
Inside a grow tent, intense LED light can heat dark plastic sensor housings slightly. While the difference is small, it adds error. I position sensors slightly shaded by upper leaves but still in open airflow. Not buried deep in foliage and not directly under concentrated diodes.
When to Use More Than One Sensor in a Grow Tent
In smaller grow tents under four by four feet, one properly placed sensor is usually enough. In larger grow tents or multi level canopy setups, I strongly prefer two sensors.
One at canopy level in the center and another slightly lower within the plant mass. The lower sensor helps detect humidity buildup inside dense foliage, which is common in tightly packed tents.
The tradeoff is controller simplicity. Some growers prefer a single sensor for cleaner automation. I disagree. If you are pushing heavy transpiration inside a full grow tent, one reading can hide developing moisture pockets.
A Simple Sensor Position Check You Can Do This Week
If you are unsure whether your sensor placement is accurate inside your grow tent, try this quick diagnostic test.
The Ten Minute Relocation Test
- Note your current temperature and humidity readings.
- Move the sensor to canopy center mass, suspended freely.
- Keep all equipment running normally.
- Wait ten minutes.
- Compare the new readings.
If you see a change of more than two degrees or five percent humidity, your original placement was likely misleading your controller.
I have done this test in dozens of grow tents. Almost every time, the numbers shift more than expected.
Troubleshooting Unstable Readings Inside a Grow Tent
Why does my humidity swing rapidly even with a controller?
Check if your sensor sits in fan airflow or near the exhaust path. Move it to canopy center in still mixed air. Rapid swings often come from airflow interference, not true humidity shifts.
Why is my canopy showing stress if my grow tent temperature looks perfect?
Verify that the sensor is at actual leaf height. If your light was raised recently and the sensor stayed clipped higher, you are no longer measuring canopy temperature.
Should I mount the sensor near the intake to measure fresh air?
No. Inside grow tents, intake air conditions are irrelevant compared to canopy conditions. You are controlling the plant environment, not the duct air.
Is it better to place the sensor slightly above the canopy?
I used to do this thinking it would prevent leaf interference. I eventually realized it consistently underreported canopy heat. Direct canopy level placement gives tighter environmental control.
Inside a grow tent, accuracy does not come from better gadgets. It comes from better positioning. Before upgrading equipment, fix the placement. Most unstable grow tents are the result of measuring the wrong air, not growing in the wrong conditions.